Working with Conditional Rich Text Fields
Description
Fields and calculations, inserting fields and calculations, creating calculations, inserting soft line-breaks, the ELSEIF statement, and more
Fields and Calculations
One of the most significant features of Rich Text Objects is their ability to smoothly mix fields, calculations, and text. Normally when you place fields on a layout, you need to assign a fixed amount of space for the field, which can result in undesirable effects when you print the layout. For example, if you were to place the field City, a comma, and the field State directly on a layout, the output might look like this:
Boston , MA
New York , NY
Las Cruces , NM
If you instead placed the same objects in a Rich Text Object, the spaces after the City field are removed automatically, giving you:
Boston, MA
New York, NY
Las Cruces, NM
Rich Text Objects can also suppress blank lines by using a soft line break. For example, suppose you wanted to print addresses in a report, and you placed the following fields directly on the layout:
Fullname
Address1
Address2
City, State Zip
In cases where a record does not contain Address2 data, a blank line would appear between the Address1 line and the City, State and Zip line. The result would look like:
John Smith
128 Master Brewer's Way

Somerville , MA02144
If you instead placed the fields in a Rich Text Object and placed a soft line-break at the end of each line, the result would look like:
John Smith
129 Master Brewer's Way
Somerville, MA02144
Inserting Fields and Calculations
In a Rich Text Object, fields and calculations are essentially the same types of objects. To insert a field into a Rich Text Object, you can drag the field you want to insert from the Drag-and-Drop List and drop it into the text. Alpha Anywhere takes the field you selected and uses it as the expression for a Rich Text calculated object, which it inserts where you dropped the field. Rich Text Object with Fields
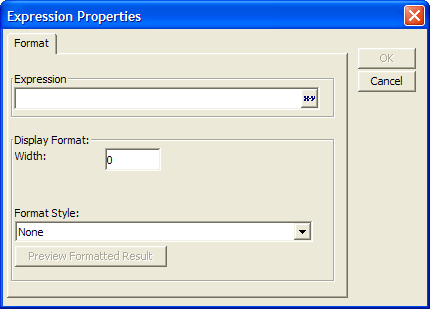
If you want to place a field using the keyboard instead, move the cursor to the place in the text where you want to insert the field, and select Text > Insert > expression. When the Expression Properties dialog box appears, type the name of the field into the Expression box, and click OK. A calculated object appears in a light gray box. When the Rich Text Object is displayed or printed, the light gray box is replaced by actual field values. The size, font, color, and style of calculated objects can be set in the same way as the properties of text. To change these properties, highlight the calculated object(s) whose properties you want to change and use the Text Toolbar to make the adjustments. Alternatively, select Text > Properties. When the Properties dialog box appears, display the Font tab. Controls appear for adjusting the font, size, color, and other attributes.
Creating Calculations
If you want to display the result of a calculation instead of a simple field-value, choose Text > expression, or use the RTF Insert Command Toolbar. If the toolbar is not visible, click the Insert button on the RTF Text Toolbar.
Click the 'xy' button.
When the Expression Properties dialog box appears, enter the expression into the Expression box. You can create the expression using the Expression Builder by clicking the 'xy' button. Expression Properties Dialog Box:
Inserting Soft Line-Breaks
By placing a soft line-break at the end the line, you can prevent an individual line from printing if it is blank. Soft line-breaks are inserted by pressing SHIFT+ENTER, and they appear in the Rich Text Editor as return symbols (). For example, a typical mail Label with a soft line-break looks like this:
FIRST_NAME
LAST_NAME?

ADDRESS_1?
ADDRESS_2
CITY STATE_PROV ZIP
A soft line-break is placed after the Address2 line, since some records do not contain Address2 data, and in those cases it looks better to have the line suppressed. You could also place a soft-line break after every line if you wanted, and the results would be the same.
Inserting or Removing a Page Break
Rich Text Fields and Objects let you insert page breaks. While viewing the text on the screen, page breaks appear as a dotted line, however when they are printed, they cause the current page to end and another to begin. This is useful for creating cover pages, summary pages, and to prevent related text from being split across a page. The quickest way to insert a page break is by pressing CTRL+ENTER, or click the Insert Page Break button on the RTF Insert Toolbar. To remove a page break, position the cursor at the end of the line before the page break, and press DELETE.
Conditionally Including Text in a Rich Text Object
Rich Text Objects let you use conditional expressions to determine whether text should be included or excluded. One use for this feature is to create Form Letters which are specially tailored to individual customers, based on data associated with the customers. For example, if you send out collection notices to people who are slow in paying their bills, you can change the tone of the letter based on how much time has elapsed since they paid. If the last payment was within 60 days, the phrasing would be polite; if more than 60 days, you could threaten to turn their account over to a collection agency. Conditions are formed by inserting the conditional statements. The conditional statements instruct Alpha Anywhere to include or exclude the text contained between them. Conditional statements include: IF, ELSE, ELSEIF, and ENDIF, and each can be inserted by selecting If... and Else from the Text menu, or by clicking the buttons on the RTF Insert Command toolbar.
To display the RTF Insert Command toolbar.
Select View > Text Toolbar to make the Text toolbar visible.
Click Insert... on the Text toolbar to make the RTF Insert Command toolbar visible.
A simple conditional statement consists of an IF expression that specifies the condition under which a block of text will print. If the condition evaluates to TRUE, the text that follows it prints. At the end of the block, you can place an ELSE statement which indicates that the following block of text is printed only when the IF expression evaluates to FALSE. At the end of the conditional block(s ) of text, an ENDIF statement indicates that anything following should be printed in all cases. Conditional statements use the following basic structure:
IF logical condition
Text to print if the condition is true.
ELSE
Text to print if the condition is false.
ENDIF
When you insert an IF statement, the Expression dialog box appears. Use this dialog box to enter a logical (TRUE/FALSE) expression. For example, if you wanted to print a block of text if the Country field of the Customer table contained "England," you could use the expression COUNTRY= "ENGLAND".
IF
COUNTRY=
"ENGLAND"
Text to print if the condition is true.
ENDIF
The ELSEIF Statement
To perform more sophisticated conditional printing, you can use the ELSEIF conditional statement. You use it in place of ELSE to specify another logical condition, as shown in the following example:
IF DATE()-
PAY_DATE
<=60
We have not yet received your payment. Please mail it today. Thank you.
ELSEIF
Date(
)-
PAY_DATE
<=90
We have not received a payment from you in over 60 days. If your payment is not received soon, we will be forced to turn your account over to a collection agency.
ELSE
Because we have not received a payment from you in over 90 days, we are turning your account over to a collection agency, and we have taken your dog as a hostage.
ENDIF
AlphaSports Example
This topic refers to the AlphaSports sample database provided with Alpha Anywhere. The RTF1 (Billing Address) and RTF2 (Shipping Address) controls demonstrate a powerful technique for displaying address information. Addresses are notable for being difficult to format because of the wide variation in the way they are defined. The contents of the RTF1 field are defined as:
COMPANY8
BILL_ADDRESS_18
BILL_ADDRESS_28
BILL_CITY, BILL_STATE_REGION8
BILL_POSTAL_CODE8
BILL_COUNTRY
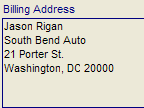
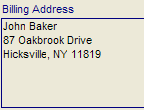
To see the full details of the code, double click the Rich Text field, then double click the individual expression. The "soft returns" at the end of the lines are input with the Shift Enter key combination. When the user looks at the data, fields with no data disappear. For example, look how the field changes when one address has a value for the company field and the other does not.
The contents of the RTF2 field are defined as (indenting and comments added to make it easier to understand):
If Ship_Same = .f.
    SHIP_ADDRESS_18
    SHIP_ADDRESS_28
    iif (
        ' if this expression is true
        Ship_City <> "",
        ' include this expression
        alltrim(Ship_City) + ", " + alltrim(Ship_State_Region) + " " + alltrim(Ship_Postal_Code),
        ' else include nothing
        "")8
        SHIP_COUNTRY
Else
    Shipping Address is same as Bill Address
Endif
This expression tests the Ship_Same variable to see if the Shipping and Billing addresses are different ( Ship_Same = .f. ).
If Ship_Same is true, the expression includes the ship_address_1 and ship_address_2 fields. It then tests to see if the Ship_city fields have data (not NULL).
If the Ship_city fields have data (true), it adds the ship_city field, a comma, the ship_state_region field, a space, and the ship_postal_code field.
If the Ship_city fields do not have data (false), it only adds the ship_country field.
If Ship_Same is false, it instead presents the statement "Shipping Address is same as Bill Address".
The Shipping Addresses for the same two records appear below.
See Also


